
By Robert Vierhout

Carbon fiber is a lightweight and strong material found in many automotive applications such as the hood or rear wing. At a high level, the parts are built using a carbon fiber cloth laid in a mold which is then impregnated with epoxy and cured. The epoxy will degrade over time if left unprotected and exposed to the elements. The degraded epoxy will turn yellow and eventually begin to peel leaving your expensive, and formerly beautiful, part an eyesore.
If the finish on your part has become degraded you’re not out of luck. You don’t need to replace the part or cover it with vinyl or paint. Because let’s be real here: nobody wants to hide the carbon fiber weave. It’s possible for the surface layer to be removed and replaced with a clear coat; which will bring it back to its former glory.
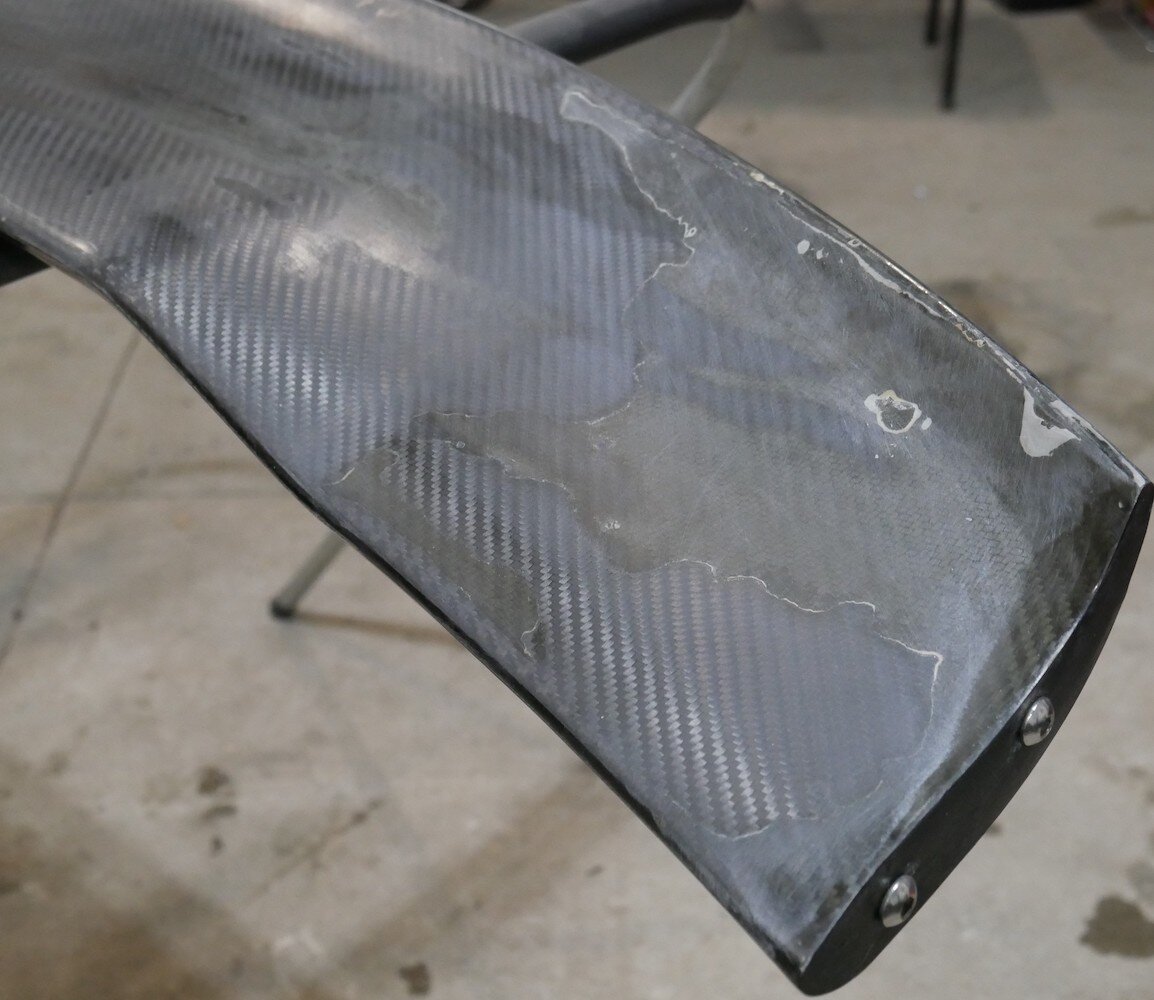
I recently purchased an APR Performance GTC-200 wing for a bargain basement price because it looked like it spent most of its life on the surface of Mars. There was only small amounts of badly degraded clear coat left on its surface. Let's see what it takes to save something like this.

First you will need: some 400 grit sandpaper, a squirt bottle – or an old Windex Bottle because you forgot to buy the squirt bottle when you went to the store - with some water and a few drops of Dawn dish soap, and some paper towels.
Start by sanding the clear coat until the surface blemishes have been removed. If the blemishes are bad enough it may be necessary to remove the entire layer of clear coat; like it was for my wing. While sanding, keep an eye on the color of the residue; it should be yellow or white. If the residue is turning black it means you have started to sand into the weave; proceed with caution. Try to avoid sanding the carbon fiber weave and only remove the clear coat.


Full disclosure: I ended up using 320 grit sandpaper to remove all of the clear coat then used the 400 grit to finish it and even everything out. The wing’s clear coat was quite degraded and there were a few blemishes once it was done.


Once you’ve sanded off all the damaged clear coat clean the part using denatured alcohol and a lint-free cloth.

Next, spray on a new layer of an automotive-grade clear coat. I used SprayMax 2K Gloss Glamour Clear Coat; which you can get for about $25 a can. Do not use a $5 can of clear coat from your local hardware store; it will not last and you will have to refinish your part in no time

Keep the nozzle of the can 6-8 inches away from the workpiece. Apply the clear coat ‘wet’; applying it in light coats will result in ‘dusting’ and the finish will look matted. Apply multiple coats until the clear coat has created a smooth and even surface along the part. Don’t be too eager to apply the clear coat too rapidly either; this will create runs that will need to be sanded smooth once it’s cured. I was able to get the wing done in two coats; which was about one can’s worth of clear coat.

Allow the part to dry before handling it and wait to perform any sanding or polishing until it has cured.
Once you are happy with your part, the final step would be to reassemble it and apply your favorite Kanga Motorsports and Ten Tenths Podcast decals then reinstall it on your car.
More Tech Tips


We decided to replace the old bent and misshaped suspension rockers with the new lighter and stiffer tubular rockers. The step by step guide should make it easier for those attempting the work themselves.