
Installing a ButlerBuilt seat is a great way to customize you Spec Racer Ford and also improve your feel with the car. Some people have issues with original fiberglass seat as they find themselves sliding around a little while driving. You can order a ButlerBuilt seat to your dimensions from SCCA Enterprises. While looking online, I couldn’t find an installation guide so I thought I would write one to help other racers to install or service their ButlerBuilt seat.

ButlerBuilt Seat Kit
ButlerBuilt Seat
Rear Bulkhead Bracket & Fasteners
Floor Pan Bracket & Fasteners
Lower Brace Bar
Seat Cover
Seat Cover Clips
E-Z Sert Foam Insert Kit (optional)

These are the mounting elements of the ButlerBuilt seat for the Spec Racer Ford including the brace bar, lower and bulkhead mounts.
Tools and Equipment
Marker or Paint Pen
1/2, 9/16 inch Wrenches / Spanners
1/2, 9/16 inch Sockets
Allan Key or Driver
3/8 inch Ratchet and Extensions
1/8, 5/16, 3/8 inch Drill Bits and Cordless Drill
Rivet and Rivet Gun
Impact Driver (Optional)
Duct Tape (Optional)

ButlerBuilt Seat Install Steps
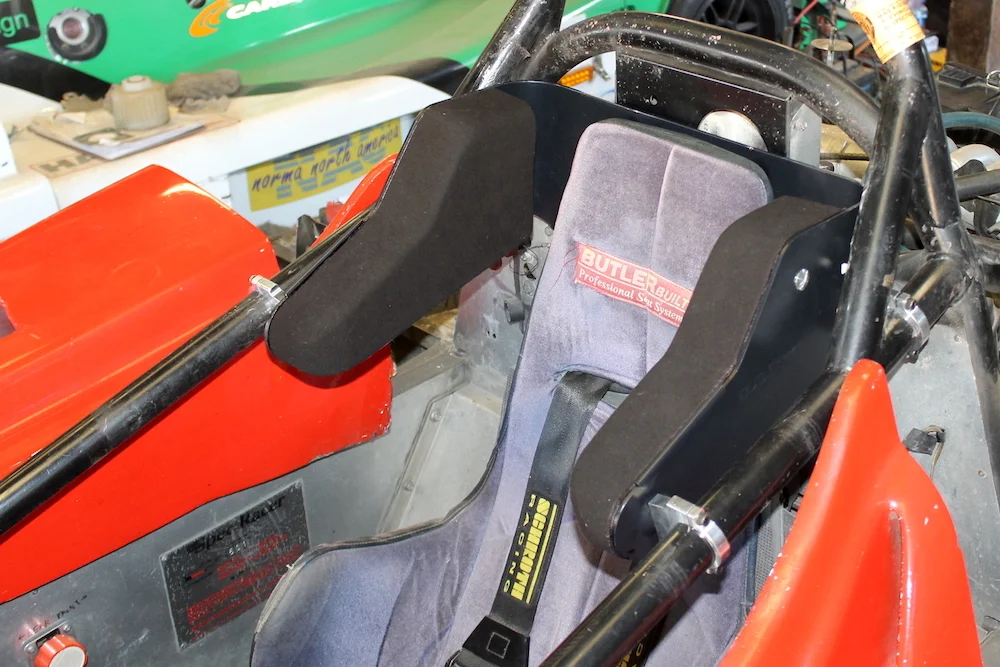
The ButlerBuilt seats have a few features and customizable options to increase your safety and comfort in the car. The seats come preformed and welded to your dimensions as one piece with two brackets to mount it rigidly to the car.

The seats have wings around your rib cage with welded in braces to provide side to side support. You can also purchase additional wings that bolt to the seat around the shoulders and/or legs.
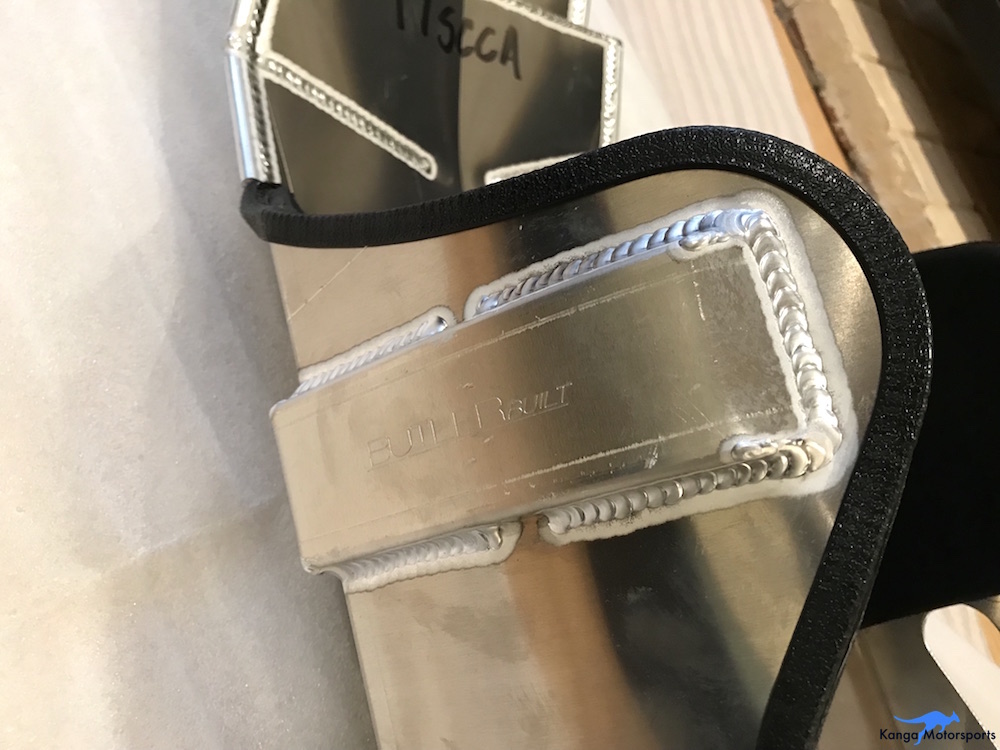
The seats can come with a step providing clearance for a head and neck restraints such as the HANS device.

Or they can come with the standard flat back depending on the drivers preference and comfort.
For six point racing harnesses the seat can include an additional lower seat belt mounting bar with belt attachment points.

Test Fit the Seat
Before drilling any holes in your frame or the seat it is a good idea to position the seat and check the location.

Checking the location will allow you to position the rear bulkhead and lower floor bracket against the frame. Mark the positions for reference later with the paint pen.
An important element to check is the clearance of the seat bottom with the shift linkage. The closet contact will likely be 2nd gear but you should run through all the gears just to check you are happy with the feel and position.

Floor Pan Bracket
With the location now worked out, you can now install the two chassis brackets. Starting with the floor pan bracket, squeezed between the two chassis frame members.

The lower mount comes pre-drilled with the four mounting holes fore and aft, eight total. Once you know where you want it line up the mount with the lines you made and mark the holes on the outside.
A 90 degree drill can make it easier for the lower frame bars but you can do without it if you have a low profile drill.

It is recommend you drill one hole first using the 5/16th drill bit. Then wedge the mount back between the frame and tighten one of the 5/16 bolts in place to securely locate the mount. Then continue to drill the other seven 5/16th holes one at time putting the bolts through each time. This will ensure that the holes are all snug and lined up correctly.

With all the holes in place you can now tighten everything down. Make sure to use a hardened washer under the bolt and nut heads. This prevents bolt tear out through the frame rails.

Rear Bulkhead Bracket
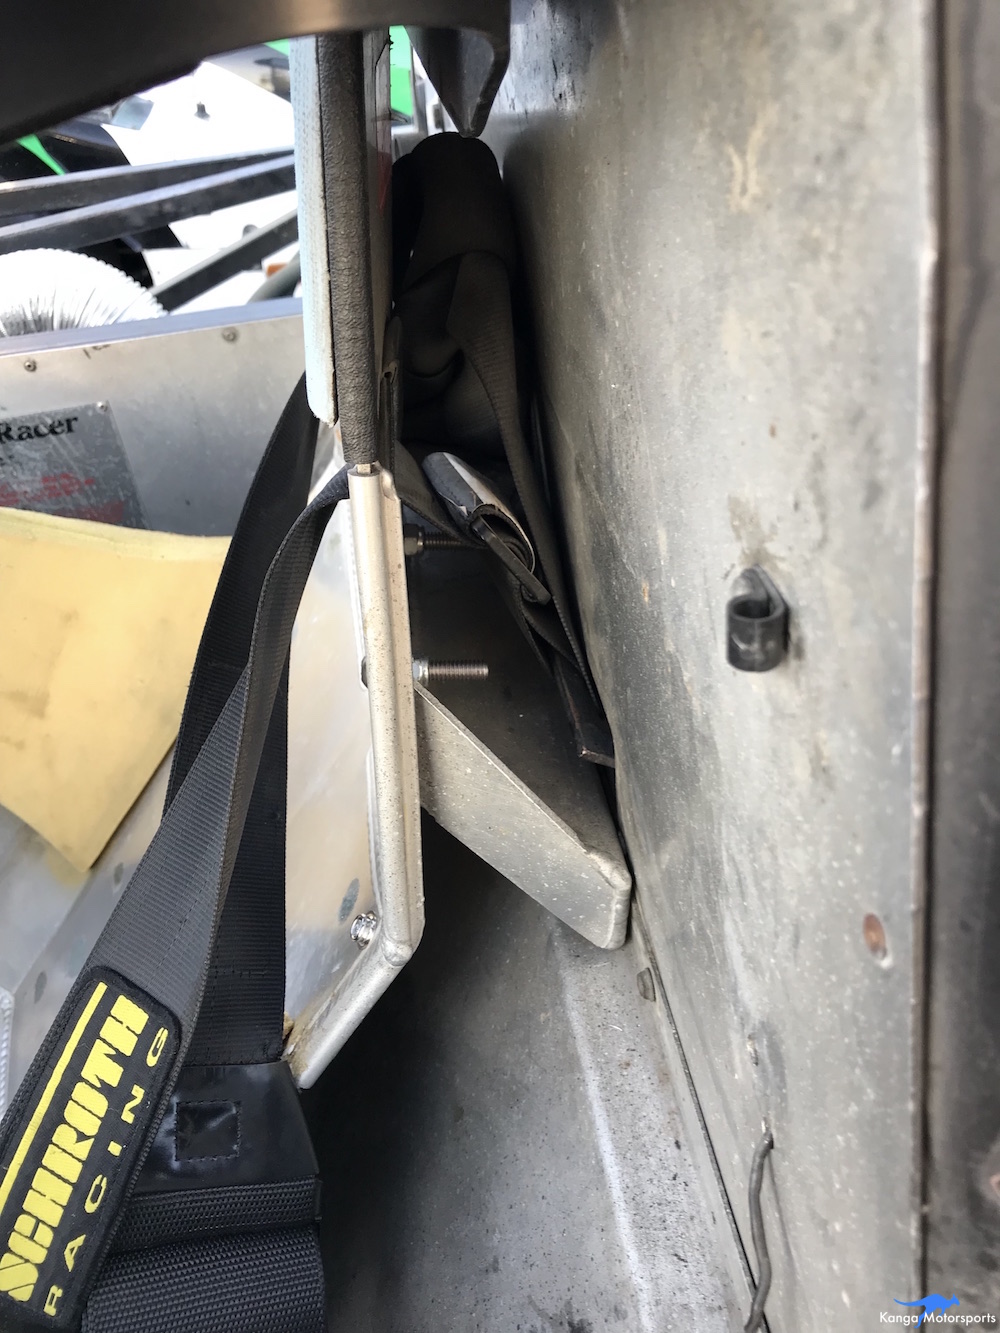
The rear bulkhead bracket is shaped to fit the rear seat back and so needs to be positioned accordingly.

The four 5/16th inch long bolts go through the rear bulkhead to the engine compartment. This is easier to install if the engine is out. It can be done if the engine is in place but access can be difficult to reach. Make sure to put the washer under the nut or bolt head when positioning in the engine bay.

When installing the rear bracket it is useful to notch the top of the fuel cell cover so you don’t have to remove the rear bulkhead bracket each time you have to access or service the fuel cell.

Again drill one hole through and bolt in place and then continue to drill the other holes to ensure they all line up snug.
Positioning the Seat
Put the seat back into position using the rear bulkhead mount as the reference point.

Recheck the shift linkage for clearance. The last thing you want to do is start drilling holes and securely mounting the seat only to find out you can not grab second gear for those tight hairpins.

Mounting the Seat Back
Now is the interesting bit of drilling holes in the seat to mount it onto the brackets. I found it best to stand in the seat to help put weight on it and securely position it in the shaped rear bulkhead mount.

Start with a 1/8th inch pilot drill and put an initial hole through the seat and bracket. Then drill out to the 5/16th bolt size. Put the 5/16th inch button head bolt through and tighten in place to securely locate the seat.

Using the same method put in another 5/16th button head bolt on the opposite side of the rear bulkhead. Make sure to place hardened washers underneath the bolt and nut heads to prevent bolt tear out. With these two bolts fastened in place you can then shift over to the lower floor mount and come back to put in the other two rear bulkhead bolts later.

Mounting the Seat Bottom
The seat uses five 3/8th inch bolts to attach to the lower floor pan mount. There are three that a longer meant to go through the brace bar.

Using the brace bar as a drilling template you can mark the out the holes on the seat bottom. Make sure it is far enough forward to be able to position the brace bar underneath with sufficient clearance to the folds in the lower floor pan mount.

Drill one 3/8th inch hole and then place a bolt through it before drilling the four other holes. I found using my foot to hold the bar in place as I drilled the holes made it easier to position the brace bar as drill template.

With all the holes drilled out in the seat bottom you can now position the lower brace bar underneath the floor mount. The three longer bolts are mounted through the brace bar and tightened in place. The two shorter bolts go through the front two holes. Do not tighten in place yet. You will need to remove the seat to install the shoulder belts.
You can see I messed up and drilled an extra hole in middle of the seat where the lower mount cut out is located. Learn from my mistakes. With the lower bolts in position now go back and drill out the other two rear seat back holes so there are a total of four fastener locations on the rear bulkhead and five on the seat bottom.
Installing the Seat Belts
Before completing the install of the seat in the car make sure the seat belts are mounted in the car. It is next to impossible to install the shoulder belts if the seat is in position. The shoulder belts are mounted to the ladder bars on the rear bulkhead or seat belt bar. Follow the manufacturer mounting instructions for your seat belts. For Schroth belts 16-17 inches of free length measured from the ladder bars to the adjusters should provide enough adjustment length for the driver when seated to belt themselves in and tighten down.

With the shoulder belts in place you can now remount the seat and fasten all the bolts in place. Using an impact driver can speed up installing the 3/8th inch lower mount bolts. Make sure to place hardened washers underneath the bolt and nut heads to prevent bolt tear out.
I’d advise against using the impact driver on the button head bolts as they can easily strip out the Allen key features. Again learn from my mistakes. The rear seat bulkhead bolts can be tricky to get in place and tighten, we found using a closed end wrench with duct tap to hold the nut in place helpful to engage the first few threads. Then using a bendy ratchet to hold the nut and tighten down in place. Having long nimble skinny fingers will definitely be an advantage, find a suitable friend. Like a broken record now, make sure to place hardened washers underneath the bolt and nut heads, if you read this far you know why.

Finishing the Seat
The ButlerBuilt seat comes with two finishing options, either a seat cover or you can pour an optional custom foam insert using the E-Z seat kit.

Seat Cover Install
The seat cover uses a metal plate shaped for going under the legs that is riveted in place. Drill out with a 1/8th inch drill bit and then rivet in place.

The seat cover slips over the top of the seat and then clips into position over the seat using push on clip fasteners.

The fasteners are installed by positioning the cover in place and marking the location of the clips. Drill out a 1/8th inch hole in the seat and riveting the lower clip into position. Work around the seat making sure the cover is tight and securely fastened.

E-Z Sert Custom Foam Insert
The E-Z Sert kit uses a two part chemical that forms into a rigid foam molded to your shape and seating position. Inserted into the seat bottom to securely hold you in the vehicle. See our video on making your own.

Enjoy your new ButlerBuilt seat and improved car feeling.
Want to receive more Racing and Tech Tips? Sign up for our Newsletter.
More Tech Tips


We decided to replace the old bent and misshaped suspension rockers with the new lighter and stiffer tubular rockers. The step by step guide should make it easier for those attempting the work themselves.