
Most race cars use vinyl decals for car numbers, class letters and driver names. Vinyl wraps and highlights can be used to change the look of a race car. Decals are also used for sponsor logos. For amateur racers the cost of vinyl can quickly add up and take away from the racing budget. However, with a small upfront investment there is a way to make custom vinyls at home and tailor them to your specific needs.
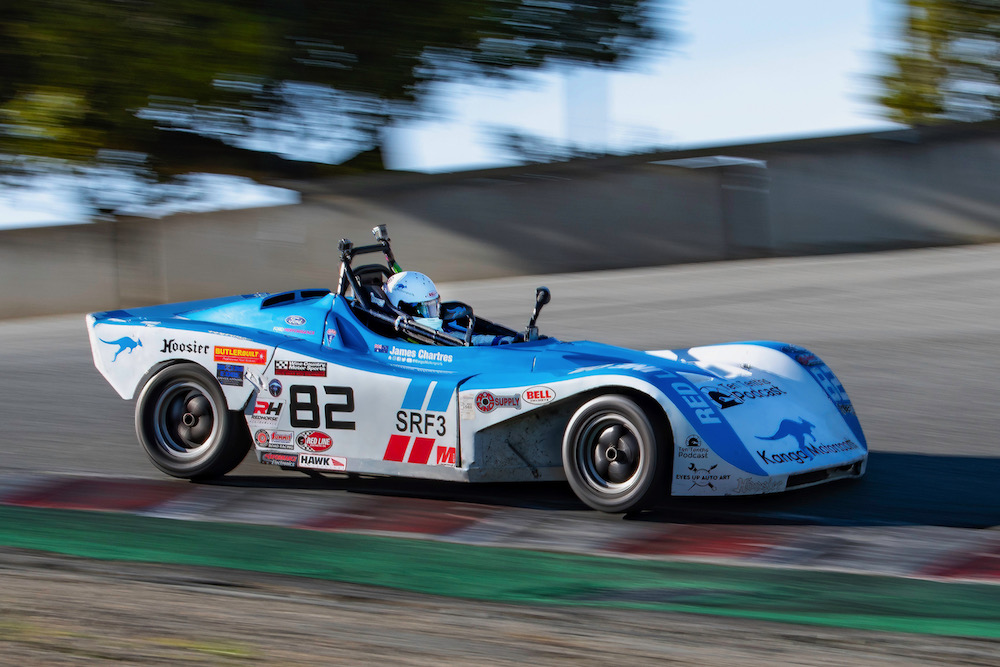
Photo Courtesy of RC Photography
Tools & Equipment:
Vinyl Cutter
Vinyl Cutter Software
Computer
Digital Designs
Rolls of Vinyl
Transfer Tape
Vinyl Applicator - 3M Blue Plastic Squeegee
Tweezers
Scissors
Rotary Cutter
Straight Edge
Cutting Mat
Razor Blade
Isopropyl Alcohol
Degreaser/Cleaner
Tape Measure (optional)
Painters Tape (optional)

Making Race Car Vinyl Decals
Start by determining what type of vinyl decals you will need for your race car this could be something as simple as numbers, race stripes or even your name. More complicated designs might include your race logo, sponsor names or even a multi-layer many-colored graphic.
Once you know what you want to make it is a good idea to measure your car and work out rough dimensions of what you want. A tape measure can be handy. Even better if you can find a tape measure used for fabrics that is flexible and contours to the shape of the car.
Another good tip is also use a digital photo of your racecar and place your design over the top in a desired area so you can get a rough feel for size, position and overall look, before cutting any vinyl.
With your design ready use the vinyl cutting software that comes with your machine to create the cutting profile.

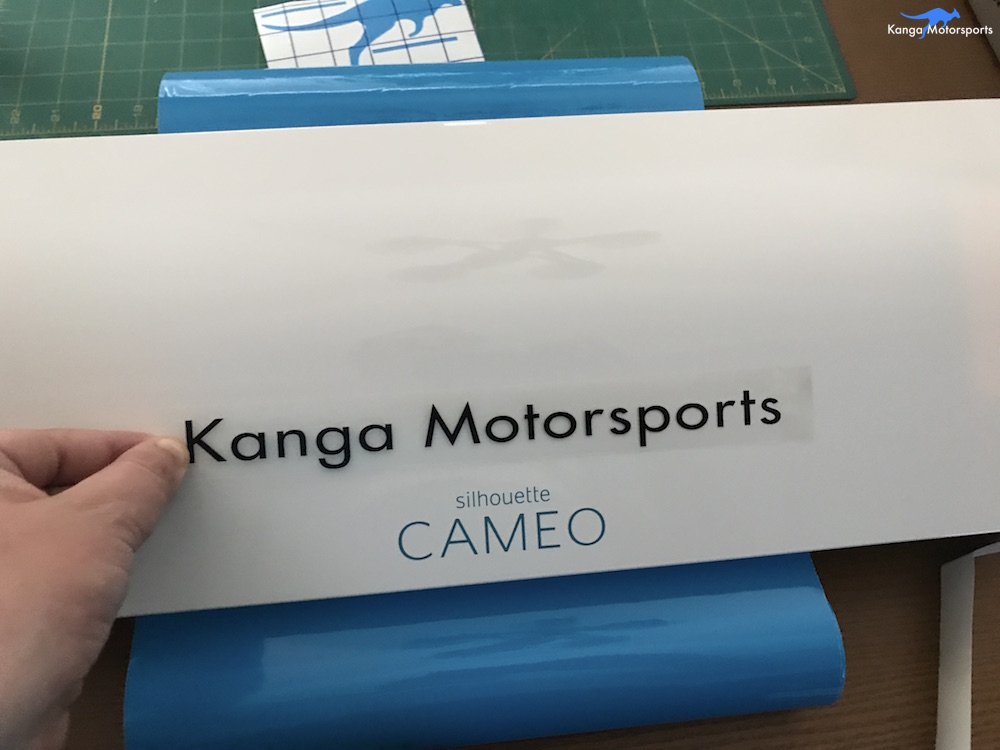
Here I have imported the Kanga Motorsports kangaroo logo to be cut out in blue vinyl. The software produces the cutting trace perimeter shown in red. I have also put a rectangle around each kangaroo to make removing the excess vinyl easier.
Rolls of vinyl come in a variety of different styles and colors. The colored vinyl comes on backing sheets much like a sticker. For race cars you want to get medium to permanent outdoor vinyl of decent quality so it will stand up to the environment. I use Orcal 651. It works well, has a large variety of colors, stands up to track conditions and can still be removed when updating the design.

Typically vinyl comes in pre-cut rolls with lengths and widths to suit your machine. A small machine, like you see here, allows for designs up to 12 inches in height and as long as you want. The thing to look out for is making the design too long such that vinyl doesn't slip in the machine rollers. I have successfully made 3-4ft long vinyl designs with the small desktop machine you see here.

Load the vinyl in the cutter and align the roll to be straight when running on the rollers. If you don't straighten the roll it can run off the rollers and cause a mess, when cutting long designs.
The adjustable cutter head can be set to different depths based on the material thickness. Once the vinyl is loaded into the machine the design can be uploaded. Make sure to specify the material type to properly set the blade.

The thin vinyl film is cut by the machine to a depth such that it cuts through the vinyl layer but doesn't penetrate the backing material. Thus leaving behind your design and allowing for the removal of the unwanted material, without ruining the backing sheet.
The cutter works like a printer or plotter feed, the cutter moves along the width of the machine and vinyl. The machine rollers move the vinyl back and forth along the long axis, allowing for cuts in two dimensions including complex curves.

As the machine continues to work through the design, the elements cut into the vinyl will extend out the back of the machine. Once the design has been cut out, unload the roll of vinyl from the machine.

Remove the newly cut vinyl design from the rest of the roll. You can use a pair of scissors, but I have found the fastest and easiest method is to use a rotary cutter and a straight edge. It also has the benefit of leaving a clean straight edge that makes it easier when loading the vinyl roll back into the machine. Use a cutting mat as your work surface to avoid ruining your table below.

Here you can faintly see the fresh cut out impressions of the Kangaroos in the vinyl.
Now comes the least fun bit of making vinyls the "weeding". Weeding is the removal of the excess vinyl from around your design. There are a variety of different tools available for the job including scrappers, picks and specialty tools. However, after trying many of them I have found that a good quality pair of simple tweezers works the best.
Using the tweezers pick out the parts of the design you do not want and discard. I find making a ball where the excess continues to stick to itself speeds ups the process and makes for a straight forward clean up. Here you can see the benefit of the small rectangles that were made in the design earlier. The rectangles allow for easier removal, segment by segment, instead having to do it all at once where there is a greater chance of snagging on the design.

By removing some of the rectangles the Kangaroos are revealed. Continue throughout the entire sheet to remove the excess so only the elements you want are left behind.

More complicated designs such as text and intricate elements require more steps at removing the various elements. Be careful not to accidentally remove items you want to keep.
In the rare cases where the cut wasn't clean, some elements can still be stuck together. A sharp razor blade is quick way of making that last little bit of cut needed to free the design. If this is happening a lot you might need to change software settings to ensure the blade cuts a very small amount past the joining locations. Most of the time this is already pre-programed into the machine.
Remember to remove the small bits of vinyl from the centers of letters, this can also be sped up by using the excess vinyl as a sticky ball.

To apply the vinyl decals to surfaces including your race car you will need to use transfer tape. Transfer tape is a slightly sticky cover layer you place over the vinyl. You can then lift the vinyl off the backing material and apply to your race car or other surface. Hence the name "transfer" tape.
Transfer tape comes in different varieties including clear, opaque or event gridded with printed lines to assist alignment. Transfer tape also comes in a few levels of stickiness referred to as tack most commonly referenced as low, medium and high tack. If the transfer tape is stickier (high tack), it is easier to lift the design off the backing, but harder to remove from the vinyl once you have it mounted. Conversely, if the transfer tape is not sticky enough it might not lift the design completely off the backing material making it hard to apply.

I have found using a medium tack works well for things like painted surfaces such as fiberglass body work, helmets and even glass beer bottles. Those examples are included below.
Find a transfer tape style you like that works well with your surfaces and type of vinyl. Once you are happy it is cheaper to buy it in large rolls such as the 300ft roll you see here.

Roll out the transfer tape and cut as much as you need. For small designs, I have found the easiest way to apply the transfer tape is to flex/fold it lightly backwards in half and start applying from the center. Once initially in place smooth it lightly over the rest of the design, moving outward and applying pressure with your hand to avoid creases or bubbles.
With the transfer tape in place you can now smooth it over with a rubber applicator like the blue 3M one shown here. Smooth over the entire design to ensure all the air bubbles are gone and the transfer tape is attached to all the vinyl.

For longer designs start by aligning the roll of transfer tape with the design and then unroll it over the design as you smooth it out with the applicator inch by inch. A tip I have found is to unroll some of the transfer tape from the roll and then roll back on. This initial unrolling helps to avoid the initial stiction of the transfer tape sticking and hanging up on the roll as you unwind it.

Next cut out the various different design elements. You can use scissors or a straight edge and roller cutter to speed up the process.
With this vinyl creation method you can now make any single color design you want for your race car. Design I have made include logos, diver names, numbers, class designations and even sponsor branding.

Vinyl Before and After

Early in the vinyl application process you can see the two color paint job.

Here you can see the difference vinyl can make to the livery and overall look of the car.
Vinyl Application
In the next several examples you can see the various design elements, how they were produced and then applied to the various surfaces.
Example: Kanga Motorsports Logo
To apply the vinyl you need to make sure you have a clean surface for the vinyl to stick too. I use a combination of simple green cleaner to remove the major grime and then isopropyl alcohol to remove any oily films.
Measuring out the location and position for placing the vinyl.

Next smooth out the transfer tape onto the vinyl, making sure the entire design is stuck to the transfer tape.

Peel the backing material off slowly making sure the design stays with the transfer tape. If you have trouble with the design from one direction try another direction or different angle. Lettering can be tricky as it has a thin profile and multiple directions. Once you have it started, you can bend the backing back upon itself so you pulling it across the design instead of lifting it up and away.

The vinyl should now all be on the transfer tape. Position the transfer tape and start placing the vinyl starting in one direction.
Smooth the vinyl across the surface using the applicator. Make sure to keep the design aligned and taught to avoid creases.
With the transfer tape and vinyl in place, go over the top of the transfer tape again, to completely adhere the vinyl onto the surface. Make sure to eliminate any air bubbles. This will help to ensure the vinyl sticks when removing the transfer tape later.

With the font in position it is time to place the kangaroo. The transfer tape here has an alignment grid. I have also incorporated straight lines into the design to help make it level since there are no flat features on the Kangaroo. These alignment stripes can later be removed just leaving the Kangaroo.

Smooth over the Kangaroo making sure there are no bubbles. If bubbles appear work from the center out to the edges using pressure on the applicator to smooth out any issues. The transfer tape acts like a barrier here preventing any scratches from the glossy vinyl so you can use moderate pressure to work bubbles free.

With the design in place you can now start to remove the transfer tape. Peel it off starting at an edge, be careful not to remove any of the vinyl. If you find the vinyl is lifting, place the transfer tape back onto the surface and use the applicator to smooth it out again.

Just like with the backing material you can also use different angles and directions to assist in removing the transfer tape around different design elements. Bending the transfer tape back against itself will also help with the removal.

Peel off the transfer tape from the Kangaroo. Here you can see I have a small bubble in the neck area. If that occurs roll the transfer tape back into place and go over it again with the applicator to further smooth out the vinyl.

Remove the alignment guides by picking at the corners with your finger nails or a plastic spudger. You can then peel back the vinyl. If there is adhesive residue left use isopropyl alcohol to clean it off.

Here is the decal in place with everything removed. You can see I have also applied the vinyl to the back of my laptop.

Example: Partner Decals
A vinyl machine can be used to make logos for partners and sponsors to apply to your car. Our partners over at TenTenths Podcast have been great supporters.

Clean of all the bug, road grime and rubber off the car to prepare the surface for the decal.
Smooth out the transfer tape over the decal.
Peel off the backing material, ensure all of the vinyl goes with transfer tape.
Apply the vinyl to the fiberglass body work and smooth over the transfer tape with the applicator.

Remove the transfer tape carefully, ensuring the vinyl design remains. If the vinyl sticks to the transfer tape, smooth it out again and use different removal directions.
Now with the completed vinyl on the body work. The contrasting black and white really helps the logo stand out on track.

Example: Kanga Motorsports Nose Decal
Larger decals with multiple colors can be a little tricky to get right. The same principles apply. Everything is just a little bigger so you have to be careful in your approach and do things a step at a time.

Cut out the vinyl design on the machine. Weed the vinyl as you would for smaller decals. You might add extra boxes or cuts to make it easier to remove different sections at a time.
For multicolored logos we have to use different rolls of vinyl. To ensure that the vinyl lines up once applied, create the design in one file. Put the different colors on different layers and only cut the layer/color you want for each roll of vinyl.
To make application easier you can also include little locating marks such as these triangles below. When the blue and black vinyl are combined together they form a square. You can use any locator designs you like, the easiest being rectangles that you line up on top of each other.

The large Kanga Motorsports logo is for the front of the car and uses curved lettering to contour to the front nose.
Clean of all the bug, road grime and rubber obtained from the race track and prepare the surface for the decal.

Just like the other examples smooth out the decal, remove the backing, line up the vinyl, place on the car and smooth down with the applicator.
Here for the two part design place the two pieces using the locating features to line everything up. Because the designs overlap we placed the text first and removed the transfer tape before placing the kangaroo over the top.
Be careful with the second piece of transfer tape you do not want to lift the other part of the design accidentally.
Remove the alignment and locating marks.
The completed two color design really stands out, especially on the front of the car.

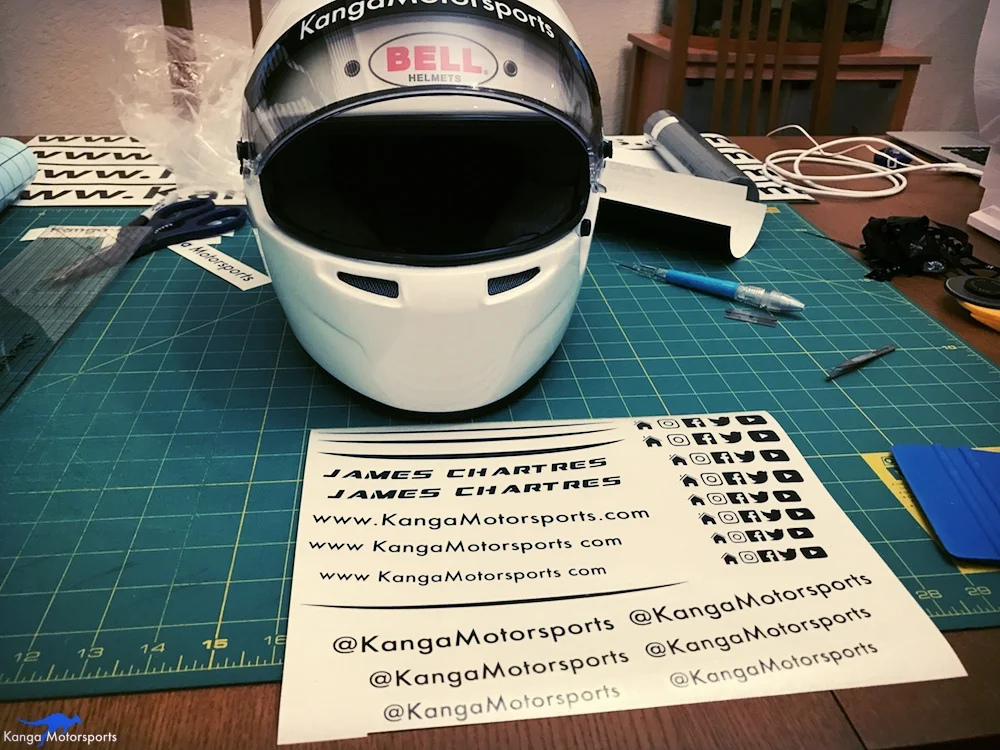
Example: Helmet
Another way to use vinyl decals is to spruce up that Helmet. Much cheaper and less permanent than a full paint job. Especially useful if you want to add some flair to carbon fiber helmets that already have a fantastic finish.
I decided to add details to my helmet including my name, social media and some highlights. The great thing about having my own vinyl machine is that I could make a variety of different shapes and curvatures and then try them out to see which ones worked best. If I wanted to adjust the design I could quickly make some new ones, right there on the spot.

A fresh helmet ready for vinyl.

Cutting out the designs and wedding the excess vinyl.

Apply the transfer tape.

Cut out the vinyl ready to apply.

Clean the helmet surfaces to make sure the vinyl sticks.

Front of the helmet with the highlight lines in place.

Cutting new social media names to better fit the curvature of the helmet.

Apply some fresh transfer tape to the revised designs.

Test fit the vinyl in place. I use blue painters tape to help hold it in position. Check the location by looking at the design from various different angles to ensure it is in the right place.
With the vinyl positioned like you want it place some painters tape on the edge to hold it in place.

Peel off the backing and smooth the vinyl into place.

Adding the logo to the top of the helmet starting with the Kangaroo followed by the text.

A logo or two, a name, some social media and a few highlights and the helmet looks much better then just the plain white it started as.

Example: Beer Bottles
As some of you that follow along on Instagram will know I also brew beer in my spare time. For some of my batches of beer I have been making custom labels.

Similar to the other vinyl above, start with the design you want, colors and any lettering. Here I use the Kangaroo and the same font to denote Kanga Brew. I then use different colored font for the different types of beer and typically match them to the colored caps to differentiate them when boxed.

Start by cleaning the bottle exterior I use some isopropyl alcohol to make sure all the oily films are gone. I also locate the seems on the bottles to avoid when placing the vinyl.
Smooth out the vinyl onto the transfer tape and lift it off from the backing.
Here I use 3 different colors of vinyl and have to place them in order Kangaroo, Kanga Brew and beer type to get the spacing right as the transfer tape overlaps.
Use the applicator to press down the vinyl and ensure it sticks to the bottle. Peel back the transfer tape carefully making sure not to dislodge any of the text.

The finished bottles came out looking great!
The Vinyl Making Process
So what are you waiting for? Now you can make all those custom decals for your car without the huge cost of going back and forth with a vinyl or sign shop. Just follow the easy steps:
Measure Out the Location
Design
Load the Vinyl
Cut
Unload the Vinyl
Weed Excess
Apply Transfer Tape
Clean the Surface
Remove the Backing Material
Apply the Vinyl
Smooth out Bubbles
Remove the Transfer Tape
Enjoy!
Want more racing tips and motorsports articles, sign up for our Motorsports Newsletter.
More Tech Tips


We decided to replace the old bent and misshaped suspension rockers with the new lighter and stiffer tubular rockers. The step by step guide should make it easier for those attempting the work themselves.