
When I first started making track notes I would write a few things down: start of braking point, gear selection, apex point and some visual reference markers. These proved to be useful for my initial track days when returning to the same track as they gave me a head start on refreshing my memory. But as I got faster, I realized that I needed a session or two to get back up to speed and shake off the rust. My notes were ok but weren’t enough to help me be faster, especially early in the day.

I started taking more notes after each on track session. Things like “brake later for Turn 9”, “More throttle for Turns 3 & 4”, and “Lift and go for Turn 6”. These notes were very beneficial on the day when I had back to back sessions but lacked the context I needed when returning to the track. I often found myself a little confused as there was no frame of reference for “more throttle”, more than what? or “brake later”, later where exactly? I kept working at a system that helped me to get up to speed quickly to go faster when returning to a track, even in the early sessions of the day.
The key was context and specific references that were easily understood and repeatable. I also started adding more visual cues from replaying my video and focusing on the of various visual references. Things like cracks in pavements, changes in the K-wall, apex berm colors and trees in the distance.
Driving on a track can be broken down to a few different things:
Position of the car on the track
Braking
Accelerating
Steering input
Gear selection
Let’s look at these individually and see how you can take better notes and give a few examples on how I improved my lap times by just taking better notes.
Early track notes from Thunderhill Raceway you can see they lack context for many of the notes making it difficult to know exactly what to do when returning to the track.
Track Maps
The first step is to get a good clear track map with space around the outside so you can make notes. Ross Bentley of Speed Secrets has put together a collection of 100+ track maps that you can use for taking your own notes. If Ross doesn’t have your local track you can normally find it on the tracks website or with a quick search online.
Braking
Taking track notes like “brake less”, “brake harder” or “brake later” are useful on the day or that weekend but a few weeks/months later when you return to the track they lack the reference and context to be beneficial especially in the early sessions. Using a number scale to represent the brake pedal pressure can be really helpful for providing the context needed to know just how much break pedal pressure to use. Many drivers use number scale of 1-10 for brake pedal pressure with 1 being a light brush of the brakes and 10 being the maximum pedal force for threshold braking. Threshold braking is defined as the maximum amount of braking just prior to locking up the wheels. The initial brake pedal pressure number can be very useful when you are trying to manage the the speed adjust for medium and high speed corners. For example heading into Turn 5 at WeatherTech Raceway Laguna Seca where your speed adjustment is critical for the uphill run to Turn 6 and the Corkscrew. You can practice on a test day using lighter and lighter brake pedal pressures to increase your corner entry speed and assign a pedal pressure number so when you return to the track you know just how hard to hit the brakes heading into that corner.
I have also on occasion used a scale of 1-5 to indicate brake release with 1 being a slow release and 5 being a quick release of the brake pedal. This helps especially in slower corners, like hair-pins, when you are trying get a lot of rotation of the car. You can use the later “R” to indicate release so you don’t confuse with brake pedal, for example R1 or R5.
Track Position
There are many elements that make up track position and these will likely be the majority of your written notes. Items include visual references, apexes, track surfaces, sound cues and corner characteristics like camber, elevation and even surface bumps.
Visual references
Visual reference notes can be very useful for indicating turn in and braking points. Examples include large cracks in the pavement at Thunderhill Raceway and the tree at the Corkscrew for pointing the car correctly, despite the rapid elevation change. These are the most common types of notes and you are likely already jotting them down. You can improve your notes by watching back your videos and noting additional items you might have missed at speed. You can also spend a test session purely just focusing on all the different things you can see while driving. Common visual cues include:
Painted lines
Cracks in pavement
Changes in berms
Fences and walls
Corner worker stations
Tire walls
Trees
Light poles
Billboards
Grandstands
Exit or access roads
Try to use more permanent visual markers as cones and brake markers can move if a car runs wides and knocks them out of place. A neat one many drivers miss are the small painted circles marked on the track surface which many track day groups use for quickly putting up cones for their beginner groups.
All of these can be very helpful for when you are trying to negotiate tricky corners or returning to the track after several weeks.

Note the large crack in the pavement patched with tar/bitumen stretching from the left side to right side under the car in this frame. These types of cracks can be fantastic visual references for braking, turn in or throttle pick up. You can also change these by their point of reference; initial view, when the nose of the car reaches, or referencing how many car lengths forward or backward.
An example shown is Turn 2 at Thunderhill Raceway. There are large cracks in the pavement that can used for determine the initial braking point. In your notes you can write down how far from the track edge you position the car for the turn, apex point and angle to the apex. Also mark where you want to get to full throttle and where you track out on the outside berm.
Apex Point and Angle to Apex
We previously talked about the Apex position and angle in our “5 More Tips To Faster Lap Times” article. The angle of the car to the Apex is just as important as the location of the Apex. Depending on how wide or how tight the corner is will determine how oblique your angle is to the Apex. Changing you angle to the Apex with more initial car rotation in the corner can really help you get to full throttle sooner.
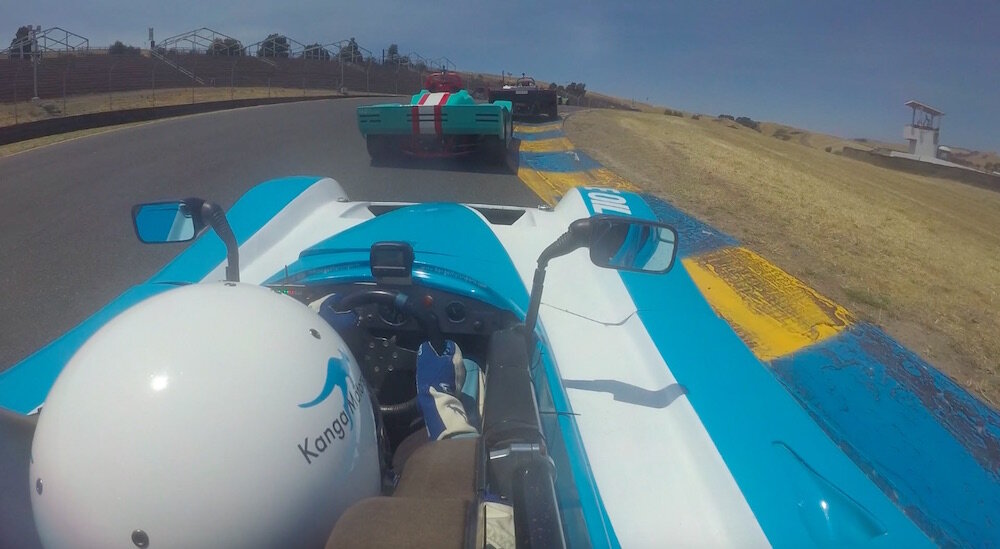
Note the various angles each of these race cars has to the Apex. Less rotation with the nose of the car pointing more to the outside of the track might delay you getting to full throttle sooner.
Sound cues
Along with visual cues comes sound. There a several times in a lap where your references can also be sound driven. These sounds can include changes in engine note due to elevation change, the rumbling sound running over “alligator strips” on the berms, the scrapping of the car as it bottoms out, and even the tire sounds from different types of pavement. I often know when I am on a flying lap at WeatherTech Raceway Laguna Seca when I hear the whir and rumbling of the car as I am using the rumble strips exiting corners to carry just a little more exit speed.
Physical Cues
Another great way to know the car is positioned correctly are the physical cues you feel through the seat and steering wheel. These feelings can include bumps in the track surface, elevation changes, scrapes from car bottoming out and feeling the changes in grip levels through the steering. Sonoma Raceway has several useful examples like the bumps in the track surface exiting Turn 2 heading over to Turn 3 and the dip in the road heading into the braking zone of Turn 11.
Corner Characteristics
Other items to note especially when a track is new to you or you only frequent the track a few times a year include items like uphill/downhill slope, on/off camber turns and track surface changes. These types of notes are very useful as they can often change your approach and line through the corner. For instance the braking zone heading into Turn 5 at Thunderhill can be shorter as you loose speed going up the hill and Turn 5 at WeatherTech Raceway Laguna Seca has a lot of camber allowing you to carry more speed than you would initially think.
Tracks often have changes in their surface due to repair work, where new patches of pavement have been installed or even concrete segments are installed instead of pavement. Often new bitumen pavement has a lot more grip because the aggregate has yet to be worn done and smoothed out. This is why you will often see new lap records set when a track is freshly repaved. Track surface notes can be especially useful when racing in the rain.
Acceleration or Throttle Application
As I took more detailed track notes I found just marking the turn in, apex and track locations wasn’t always the most useful for some corners. For long sweeping corners where you spend a lot of time in the turn, the throttle pick up point or even more importantly the location where full throttle is reach can be extremely useful. If you are looking for more speed often getting to full throttle earlier can help you gain tenths of a second. So on a test day as you are trying to go faster and moving the full throttle points it is great to take these notes for the next day or next time you return to the track. A good example corners are the long sweeping Turn 2 at Thunderhill Raceway or the carousel (Turn 6) at Sonoma Raceway where early full throttle application can really reduce your lap time.
Steering Input
Just like the brake pedal you can also assign a number to how fast you turn the steering wheel when turning into the corner. I use a 1-5 scale with 1 for slow hands and 5 is the fastest turn of wheel. In general you want to use fast hands for the slow tight corners like hair-pins and slow had for the fast sweeping corners. To differentiate the steering number I preface them with an “S” for example S1, S2, etc.

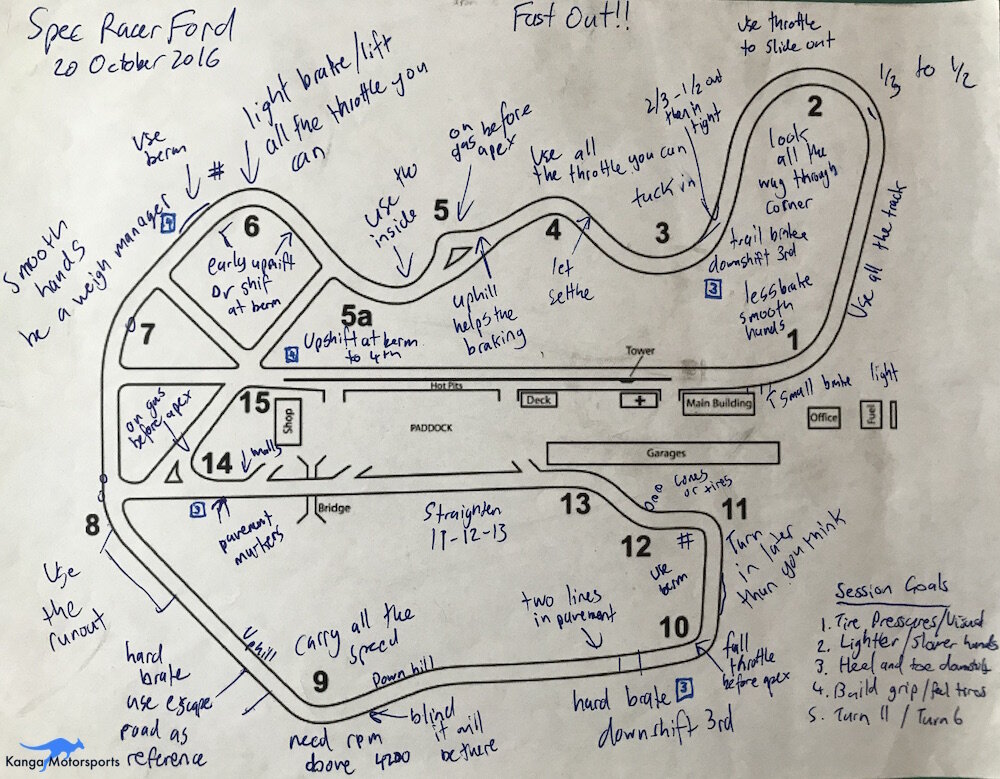
Here are some track notes from Sonoma Raceway from a few years ago you can see I started adding more context and references to help when I returned to the track. Also notes on steering input and brake pedal pressure. I tend to use the bottom corner to lay out various priorities for the different on track sessions.
Gear Selection
Gear selection is pretty straightforward and most begin using it early on taking track notes. The most obvious thing is knowing what gear you are in when and where you need to shift. I mark these by using a number surrounded by a square to differentiate them from turn numbers or other notes. Where I find it most useful now is knowing which corners I could take in a couple of gears and where I am trying different gears to see which is faster. A great example is Turn 4 at WeatherTech Raceway Laguna Seca which is a fast right hander if you have never driven there before. In the Spec Racer Ford Gen3 you can either take in 3rd or 4th gear. In 3rd gear you are right at the top of rev range and can hit the limiter exiting the corner upsetting the car or you can take it in 4th but if you enter the corner slow because you didn’t get a good exit from Turn 3 the motor can lag in 4th gear and you won’t get good acceleration down the straight to Turn 5. Making notes on my track maps helps remind me what I was working on the last time at Turn 4 given the conditions, what I thought would be faster and what the data showed last time I was there.
For more tips check out this great video from Ross Bentley of Speed Secrets that talks about how he uses and makes track notes.
Putting It All Together
So here are a few different things you can do to improve your track notes:
Visual references (cracks in pavement, walls, trees)
Sound cues (engine notes, berm gators, pavement sounds)
Physical cues (bumps, scrapes and grip levels)
Corner Characteristics (camber, elevation, track surface conditions)
Throttle pick up locations
Full throttle application location
Brake Pedal pressure scale of 1 to 10
Brake Pedal release scale of R1 to R5
Steering input scale of S1 to S5
Gear Selection
See my track notes for examples with some of the different elements we have discussed. What track notes do you take? What other items do you include? Send us a note we would love to hear from you.
More Racer Tips


Want to be faster at the track? We share our tips and tricks on reviewing your videos and improving your lap times.